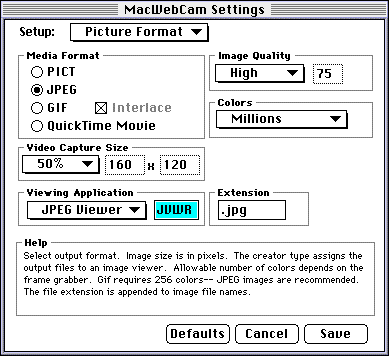

MacWebCam 2.7 offers 4 modes of saving images. The first three are standard graphic image files-- PICT, JPEG and GIF. MacWebCam also supports QuickTime movie generation. These file formats offer both Mac-only (PICT) and cross-platform (JPEG/GIF) support. The resolution and size of the images will depend on the format chosen, the image quality, the size of the image, and the number of colors saved.
PICT files are used on the Macintosh for a variety of applications. PICT files cannot normally be used outside the MacOS environment.
JPEG files are used on most platforms. The image quality can be changed to change the size of the image file. JPEG supports a wide range of colors and image sizes. It is the recommended format.
GIF files are used on most platforms, but are limited by the number of colors that they can represent. GIF files can be interlaced to let the viewer see more of the image before it is fully downloaded.
QuickTime is Apple's award winning multimedia environment, encompassing video, sound, MIDI, and virtual reality. MacWebCam lets you create QuickTime movies that contain a time-lapse series of images over a period of time.
Specify the size of the video to capture. The larger the image, the larger the files will be. Some video digitizers only allow certain video capture size settings. If a image size is not supported, the change will not be made when saved. However, most digitizers support arbitrary sizes.
MacWebCam does not have any facilities for viewing saved images. You can choose which application will be used to view the resulting files you save. The default for viewing images is JPEGView, a popular image viewing application. QuickTime movies default to Apple's MoviePlayer. Advanced users: if your favorite application is not available in the popup menu, the application's creator type can be entered.
Setting the image quality determines the quality (and size) of JPEG and QuickTime movies. The higher the quality, the better it looks and the more disk space is required to store the image. If the image will be going over the internet, lowering the image quality will increase the speed at which the image is transferred.
Video digitizers must capture video at a specified number of colors. Some digitizers can capture images at any depth (number of colors.) Some digitizers can only capture images at a certain number of colors. The more colors you select, the better the image will look and the larger the file will be. You need to set this setting based on what is allowed by the digitizer and by your bandwidth needs.
Files that will be sent over the internet need a file extension. This extension will be added to the end of each of your file names. Normally you will not need to change this setting.
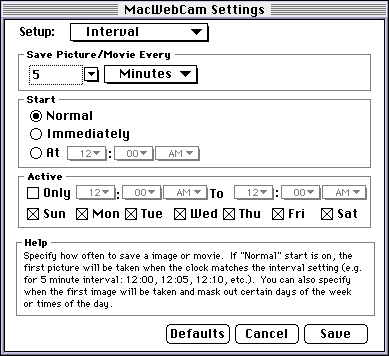
The interval specifies how often a movie or image file is saved to disk. Remember that for QuickTime movies, the interval is not how often a frame of video is added to a movie, but the length of time that frames will be periodically added to the movie.
You can select a number of seconds, minutes, or hours to wait before saving another picture or movie to disk.
MacWebCam lets you choose when the first image will be saved. For instance, often you want to be able to save an image every hour, on the hour, or every 15 minutes-- at 0, 15, 30, and 45 minutes past the hour. If this is the case, set the start time to normal. If you don't care when each image is taken, you should specify start immediately. If you want to take a picture at, for instance, noon and midnight, you can specify that the first picture be taken at 12 pm.
If you want to mask out certain times of the day or week, you can have MacWebCam only take pictures during the times that you select. QuickTime movies that are started always record for their interval setting and do not terminate when a time block-out period is entered.
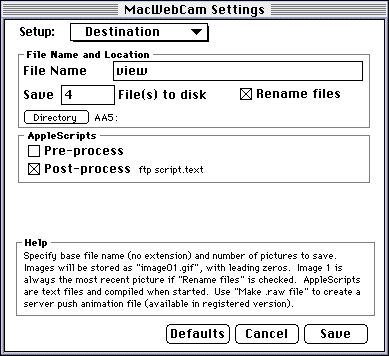
The filename is used to specify the root of a series of media files. The file name defaults to the document name. The exact filenames that are created depend on the root (document) name, the extension, and a file number.
Often you'll want to save a history of files, so MacWebCam lets you save a number of images to disk. If you check Rename Files, each time a picture is taken, the older files are renamed so that image 1 is always the most recent, image 2 is the next recent file.
Each file is given a numerical suffix with a leading number of zeros, depending on the number of images you save. Given the example where your document and root name is "view", your image type and extension is jpg, the following file names would be created.
|
Files to Save |
File names created |
|
1 |
view.jpg |
|
2-9 |
view1.jpg through view9.jpg |
|
10-99 |
view01.jpg through view99.jpg |
|
100-999 |
view001.jpg through view999.jpg |
|
1000- |
view0001.jpg through view9999.jpg |
If you need to put your file in a particular directory, for example, so your web server can access them, you need to specify the directory where each file will be saved. If you leave this unspecified, the files will be saved in the same directory as the MacWebCam application.
MacWebCam has a feature where you can specify an AppleScript to execute right before saving a media file or immediately after saving a media file. You can specify a pre- or post-process file by choosing a text file that you've previously tested with ScriptEditor. These text files are compiled when the Cam is started, or when the Cam is changed (by AppleScript or by setup dialogs.) This means that if you change the contents of a script text file, you'll need to stop then start the cam, or send a "set preprocess applescript file" AppleScript command to MacWebCam.
What you do with a pre/post processing script is up to you. Since MacWebCam is fully AppleScriptable, you could send an AppleScript to the MacWebCam application to change any aspect of your document. For instance, you could write a simple AppleScript that sets a caption to a new color, style or message. You could write a script to change the logo based on the time of day. You could even write a script that puts a dynamic element into a caption or logo-- for instance, you could put the current temperature in the caption.
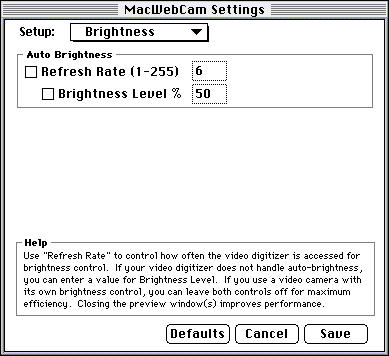
Some digitizers have a software based exposure level that compensates for changes in light conditions. If yours does, you may want to set the refresh rate to a value between 1 and 255 (1/10th of a second.) If your video digitizer and camera do not have a brightness control, you can use MacWebCam's brightness control. Many video cameras (especially Video Cameras) have auto-iris control. If your camera compensates for brightness, leave the refresh rate and brightness level unchecked.
Why is this needed? Because if the light level changes, the next time the video digitizer takes a picture, the brightness level will wrong. This can affect the quality of saved images, and it can cause the first few streamed images to be either too bright or too dark.
The higher the refresh level the more accurate the brightness level should be and the more CPU will be used.
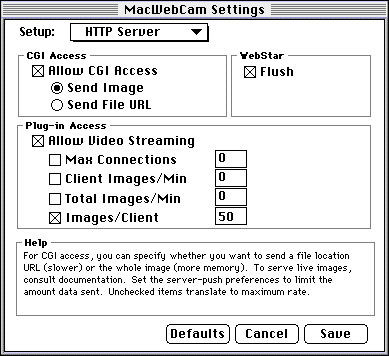
MacWebCam works with most web servers. Live (streaming) images are available when used with a WebStar 2.0 plug-in capable server. CGI access is available on almost all web servers. Both CGI Access and Plug-in Access only work with still images (JPEG or GIF). The WebStar Flush command will work with any media format.
CGI (Common Gateway Interface) is a simple method of exchanging data between a web server and another application. If your web server supports plug-ins, you should use them instead of CGI mode, because of their more efficient operation. The CGI will request a single image from MacWebCam by the webcam's document name.
If the Send Image is checked, the entire image will be transferred to the web server in memory. If Send File URL is checked, a temporary file will be created with the latest image, and a reference to that file will be sent to the web server. If your images are small and your server is not getting lots and lots of hits, you may want to send the entire image to avoid using the hard drive. On the other hand, if your images are large or there are many requests for the same image, MacWebCam may not be able to process all the requests due to a lack of memory unless you send the File URL.
Plug-ins are the best way to exchange data between an application a web server, although not all web servers support plug-ins. A WebStar plug-in is included with the MacWebCam package&endash; consult your web server's documentation to find out which plug-in standard is supported.
Streaming images is a nice way to show real-time graphics to a wide variety of browsers without having to use a special application. If you Allow Video Streaming, images can be requested non-stop until a set number of images have been sent, or until the viewer hits the browser's Stop button. You can limit the number of simultaneous connections by entering a value in the Max Connections edit field. You can govern the rate that images are sent out by changing the Images/Min edit fields. The number of images that are sent can be limited by entering a value in the Images/Client edit field.
If you are saving images to disk and are accessing the files with WebStar, and you do not use the MacWebCam plug-in to serve file, you'll need to flush the data cache each time it saves an image that you intend to serve on your web site. If you don't, images could be sent out with invalid header information, and broken images will be seen on the browser side.
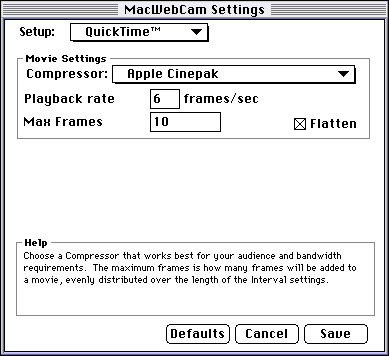
If you've specified the image type to QuickTime, you can specify the compressor, playback rate, and number of frames in your movie.
The compressor (codec) is what is used to compact the images into a small movie file. Only some compressors are available on the majority of platforms. Photo-JPEG is the default compressor for MacWebCam. Cinepak provides good results but uses a lot of CPU time (usually more than 1 second to add a single frame of video.) For the widest cross platform audience, choose one of the following compression codecs: Cinepak, Photo - JPEG, Graphics, Animation, Video, Photo-CD, Intel Indeo, or None. When QuickTime for Windows 2.5 comes out, Component Video, M-JPEG-A, and M-JPEG-B will be supported. Consult the QuickTime documentation at the Apple Quicktime site for more information.